Monday, December 21, 2009

40K MODULAR TABLE

If you were putting the tiles on a surface that was at least 4'x6', then you could probably get away letting gravity keep it all together. However, there's always table bumping and the support surface is often smaller (like a kitchen or folding table), meaning a portion of the tiles need to be able to cantilever off the edge.

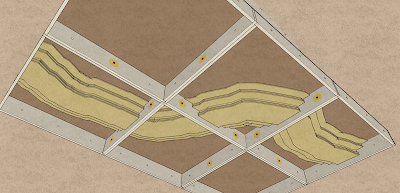
They need to be joined somehow, and while I have many ideas about how to do this, the one in the lead at the moment involves clevis pins and hair-pin clips...you may be familiar with them by a different name, so here's what I'm talking about looking under the tiles: (color for clarity)

I'm showing three holes per side in case the tile has a feature that dips below the playing surface, as discussed in the last post and shown here: (pinned at highlighted locations)
Bolts and wing-nuts would provide a more secure connection, but wouldn't be quite as convenient. However, it would be easy to have both on hand and use whichever was more appropriate.


And here's a look at some modular hills placed on the playing surface instead of being joined to the surface:

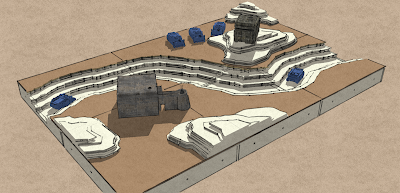
P.S. The bunkers and vehicles are from 3D Warehouse, my thanks to the original modelers.

See part 1 of this modular table idea here.


Wednesday, December 16, 2009

40k Terrain - Modular layout

While I know using 24"x24" table 'tiles' increases the number of joints (and therefore helps in guessing ranges/distances), I still think they have merit due to their flexibility. The discussion over at Strictly Average inspired me to post some of my past terrain thoughts (which are now on hold, due to the Waaaagh!)

The idea: Instead of flat 24x24 modules, build simple 5-sided boxes so that the main playing surface is elevated. This gives you the freedom to go both above 'grade' and below.
Also, while I like the idea of modular hills, I don't think I'll include them in the table tiles. Done separately from the table, the hills would be more flexible and could hide the table joints/measuring aides.


See part 2 of this modular table idea here.

See how to make the buildings here.

Friday, December 11, 2009

Mek Update...

Crawling slowly toward completion. I think I might stop here and move on to painting him. I thought about adding mek boy odds-n-ends, but with the huge pack and choppa-tool, it might get too busy (if it's not already).
Besides, I need to scratch up some kannons so I can actually play a game...


See him finished here.

Friday, December 4, 2009

KFF BIG MEK...

...surprise surprise, a WIP. I wonder if I'll ever be able to post a finished project...


See him finished here.

Wednesday, November 11, 2009

Because I don't know how to post it on your site...

...and because you wouldn't want it there anyway.

Jeff, the Raiders are looking very cool, and looking them over led to some sketching, so I thought I might as well share. The DE's look is so jagged, I wondered how that might be played up in the sail. That led to another mast, mid-ship, that the main sail attaches to. The shorter mast also has a sail, tying into the back of the ship. Ended up looking like shark fins, but I don't know, maybe that fits with your theme too.
I know the scale and shapes are off, but hopefully it still hints at the idea:
Also had an idea for material of the sail. Yes, it's probably another bad idea, but I thought I'd share it too. It seems like I remember mention of 'energy sails/fields' on a DE ship in the book Nightbringer. Not sure about that one, though. Anyway, my idea was to use 'granny-grate' (i think it's used for needlepoint, just semi-rigid plastic mesh) for the sails.
Painted in gradients, I think it could look like the ships 'crackling energy sails'. Might play into the Night Shield upgrade too, don't know much about it.
Comes in different mesh sizes:


Anyway, I've been working too long tonight, so I might be addled. Feel free to disregard, especially since the raider looks sweet as-is. Keep it up, your creativity is inspiring me to get to work on some of my own conversions/builds.

Friday, October 2, 2009

The Ursamarines vs. The Ursus Bellum

Still struggling with the name decision, but I guess I'm leaning toward Ursamarines. In the grim dorky world of my far 40K tournament future, I think it will be more acceptable to other players. Ursus Bellum sounds singular, some might need an interpretation, and it might come off like I'm just plain trying too hard. It's a tricky thing, finding something that's cool in a nerdy world, and still have it be my brand of nerdy.

I need to work on the lighting for my pics, but below are a couple marines showing my newly finalized colors. The ML was painted entirely with this new scheme, while the flamer was painted in a different scheme and then touched up to bring in line with the new.
This was more about finding the colors, and less about painting to top standard. Hopefully, my line highlights will be more careful and neat on showier pieces. Also, these obviously need a lot more work (weapons, details, etc. but I do like the eye of the ML trooper).

I decided to ditch the pauldrons with a bleached bone field. They are bears...bears that have been charging through the blood of their kills, seeking more enemies to slay. Really, I wanted brown, but after deciding that most will have red legs, I found that the brown was overpowered by the huge white pauldrons. I think this will also help with the chapter symbol, a nice dark background to slap a white symbol on. I may have some vets with white helms, and some sarge's with red helms. We'll see.

Because of the dark lighting, you'll definitely need to view the larger pic to see anything, and maybe even zoom in on that.

Also, with the switch to brown pauldrons, I can get away with a pauldron trim color, which is more appropriate since it's a codex chapter at the moment. I'm leaning toward a muted gold for second company or red for third (Ultramarines standards)

Blah blah blah...

Update: a stab at correcting the shoddy pic...colors are a little more true to life:

Thursday, October 1, 2009

40K TERRAIN with Pegasus Hobbies Gothic building sets...

This is a little closer to what I had in mind. I'd still like to stretch the building sets with some less ornate panels...get more out of them. I'd also like to elevate the whole structure and have a stair leading up to the main entry (again, like zigor). That would also allow for a blasted floor and rubble spilling out of the building.

And of course, whatever configuration I set the pieces up in, I plan to have a lot more flooring remnants at the various levels. I like the idea of almost everything counting as a ruin, but minimizing the area terrain (I wouldn't want to play the entire interior as area terrain). I'll have to consider that if I decide to glue these up into a permanent configuration. Right now, I'm just having fun building and seeing how far the pieces will go (I used most of what I have on this set-up).

I was very careful when I was shooting the pics...some of them are pretty fuzzy...


Friday, September 25, 2009

40K TERRAIN MADNESS, why I have no beer money...

Okay, I mentioned I made a purchase...here's a preview:

In the boxes:

The boxes opened: (there's a lot of plastic here)

A quick structure: (all boxes are modular and compatible, this is probably no more than 15% of the available pieces)

The pics aren't great, I had to coax each shot from the dying batteries...

but I'm excited by the possibilities. The pieces snap together, so I can take apart and reconfigure with ease. I'm eager to take a look at the cathedral we discussed last weekend, ruined by the Crashed Imperial Aquila Lander.

However, I'm also looking forward to finalizing (to a point) the putty casts I did. I do plan to reduce the scale of the structure you saw and make two ruined corners instead.

Friday, September 11, 2009

WARHAMMER 40K TERRAIN, casting building components...

Well, I finally did a wall panel. I'm not sure I'm all that crazy about he results. These haven't been sanded or shaped to fit together, or glued, painted, etc. (they are just stacked in the picture). Those things might help, but I'm not sure about continuing with this idea.

I like the Gothic buildings of 40K, but our resin casting endeavors will probably yield much better results. As mentioned before, the foam molds and water putty might ought to be left to concrete barricades, bunkers, bridges, etc. Or a more industrial style building. Or natural elements...

Still, I'll probably cast a few more of these and remove some of the 'window glass', just so I can make at least one 12"x12 or 24" building ruin.

Unfortunately, the first glimpse of a home-made building left me thinking...man, I'd rather pay $20 bucks and get this:


Speaking of that, if I were to buy a building, what are your thoughts on an Imperial Sector (manufactorum, administratum, sanctum imperialis, additional pieces for 4th bldg)

VS.

the Imperial Strongpoint (box set contains one Imperial Strongpoint, including two plastic Bastions and three plastic Aegis Defence Lines).
I guess it just depends on the type of battlefield you're going for...obviously they pushed one for Cities of Death and one for Planetstrike. The Strongpoint does come with some cool weapons bits...not sure if they would come into play in a normal (non-Apocalypse) game though.

Monday, September 7, 2009

CONVERTING OLD TERMINATOR TO NEW SIZE...

If you remember, I got a batch of old (circa '94 or '96) terminators on the cheap, and by comparison to the current models, they seem diminutive and static. While I don't plan on getting caught up in 'true-scaling' my army, I would like there to be a difference in the sizes of a space marine in power armor compared to tactical dreadnought armour.

I've been kind of itching to see what I can do about this, so I worked more on this than terrain over the weekend. Below: the two old terminators were from identical blisters and would have the same pose if not for the conversions. The current terminator is from AoBR, but I think it's the same size-wise as those from a termie box.


You see the base layer of green stuff over the pins...I'll build this up to make it look seamless and add detail later.

360:


gotta fix that back crotch the old models have...gotta give 'em a bum...

We spoke before about sharpening the blades of weapons, I decided to do it on the lighting claws since they were so bent and chunky to begin with.
And here's a couple shots of the craters I was talking about...the first attempt is on the left, the process still needs work, will be interesting to see how they look painted


OK, terminator curiosity satisfied for the moment. I like where it's headed, but it is a lot of work...not sure if it's worth it to do every one.
Maybe I really will get to a wall panel mold this week...

Friday, September 4, 2009

WARHAMMER 40K TERRAIN...getting out of control...

I'm coming up with ideas for molds faster than I'm making them or casting. Here's an update showing floor tiles (that you can't see) and a multi-use buttress element...and some entourage for fun and loose scale (thanks to the modelers of 3D Warehouse).


While I didn't shoot a pic yet, I did try another sand mold blast crater the other night. It came out better, but I'm still not sure they're worth making. I'll try to get it on here, I'm interested in getting your opinion (may be hard to tell without being painted). Of course, for an average cost of pennies, they look pretty good.

Sunday, August 30, 2009

40K TERRAIN, SKETCHUP OF PANEL #2

Okay, I skipped the floor panel for now...that will be mold #3.

Mold #2: The same mold could produce all three panels shown in the picture, depending on the spacer blocks I included. The foundation panels and parapet panels are mold #1 from the previous post.


I think the window mullion (center partition) is too thick...proportion is a little off, but I also think it's as slight as I'm comfortable with using the Durham's. It's not so off that a building made from these panels could be used to pad out a battlefield that had other GW or Pegasus items. (also, it'll be much less noticeable once "battle damage" is applied...)